The WA-215 is supplied with a single gang 60mm deep back box and
mounting plate for flush mounting or surface mounting to a wall. Install
the back box to the chosen location and knock out any of the pre-punched
discs in the sides for cable access as required.
Screw the mounting plate into the front of the back box and feed power,
speaker, trigger and signal wires through the back box to the WA-215 and
connect to the relative terminals.
(see “Connections” on the next page)
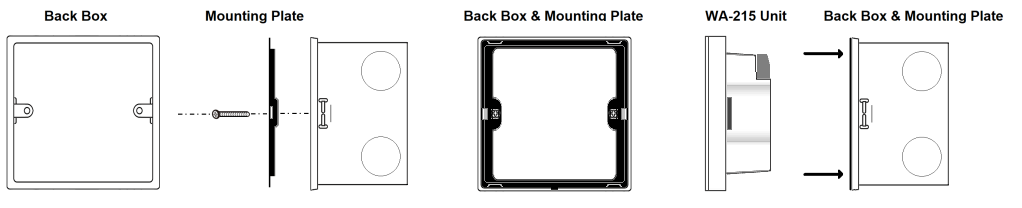 Alternatively, the mounting plate can be fitted
into a standard 86 x 86mm pattress box top accommodate the WA-215, so
long as there is a minimum 47mm mounting depth
Alternatively, the mounting plate can be fitted
into a standard 86 x 86mm pattress box top accommodate the WA-215, so
long as there is a minimum 47mm mounting depth
Connections
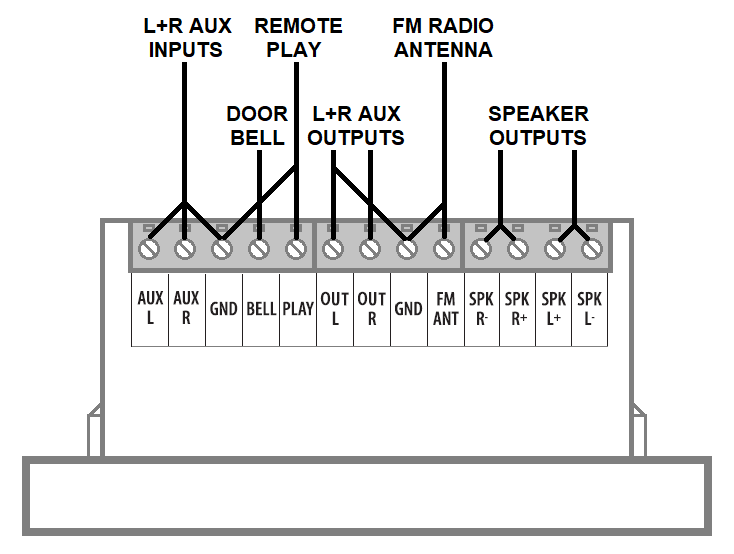
Connections to the WA-215 are made using the Euroblock screw terminals
at the rear.
These terminals may be unplugged for convenience when inserting the
wiring to them.
Ensure all speaker, FM aerial, remote play/doorbell, AUX input and
isolated mains wiring is already fed through the wall and through the
back box ready for connection to the WA-215 rear panel.
Connect left and right speaker wires to the relevant “+/-” terminals on
the WA-215.
For better FM reception, an aerial may be connected to the FM ANT and
GND terminals.
A line level input from an external audio source may be connected to the
AUX terminals. These should be fed from the audio source to the WA-215
using shielded 2-core cable.
Connect Left+ and Right+ to the AUX L & R terminals and both Left- and
Right- to GND.
Similarly, L+R Aux line output can be connected to further equipment via
the OUT terminals.
For remote play/pause control, a momentary switch may be connected
between the REMOTE PLAY and GND terminals. Likewise, a doorbell function
is available by connecting a momentary switch between the DOORBELL and
GND terminals.
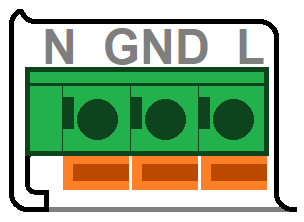
Finally, with the mains isolated, connect 230Vac mains to the power
terminals marked “N GND L” on the rear of the WA-215.
Connect Live to “L”, Neutral to “N” and Earth to “GND”
Push in the orange spring grips using a screwdriver, insert the stripped
wire and release the orange grip to secure the connection.
Feed the wiring carefully into the wall cavity to take up any excess,
rather than compressing it inside the back box, which may damage the
wire and connections. Push the WA-215 unit firmly onto its mounting
plate to fix into the back box or wall cavity. Keep the mains power
isolated (off) until the WA-215 is fully installed into the wall,
covering the rear panel wiring.
If any function is not operating correctly once installed, isolate the
mains power again before removing the WA-215 unit from the wall or back
box.
To remove the WA-215 from the mounting plate, insert a screwdriver in
the bottom centre, lever the faceplate forwards and carefully prize the
edges of the WA-215 away from the mounting plate.
Re-check connections and replace the WA-215 before switching the mains
power back on.
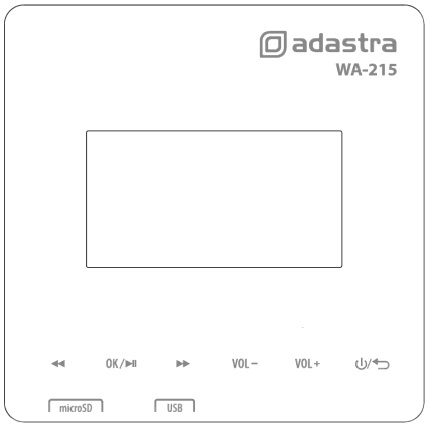
Front Panel
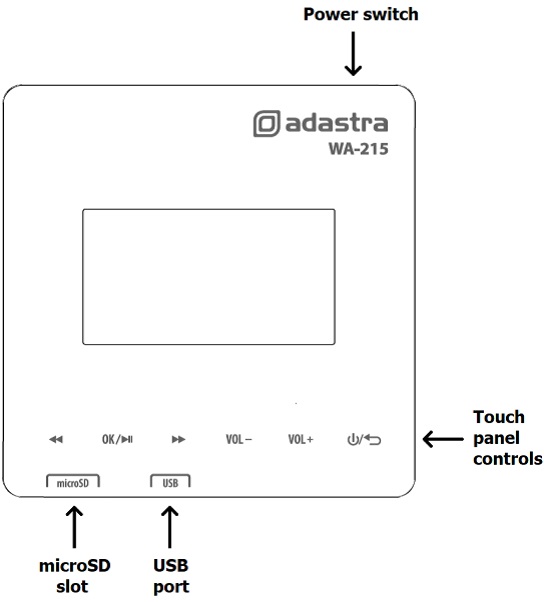
- revious track/station
- Play/Pause / BT Mute / Select
- Next track/station
- VOL- Decrease volume level
- VOL+ Increase volume level
- Return / Hold = Power
Bottom Edge

Operation
To power up the WA-215, slide the power switch on the top edge to the
left position.
The LCD screen will light up and show the welcome message (unless USB or
SD media are connected). Touch the Return key to enter the menu.
The bottom edge of the WA-215 is home to a microSD slot and a USB port
for inserting memory devices containing digital audio files to be played
via the internal media player.
The front panel is completely flat with a row of touch-operated controls
below the display.
A brief description of each of these controls is given above.
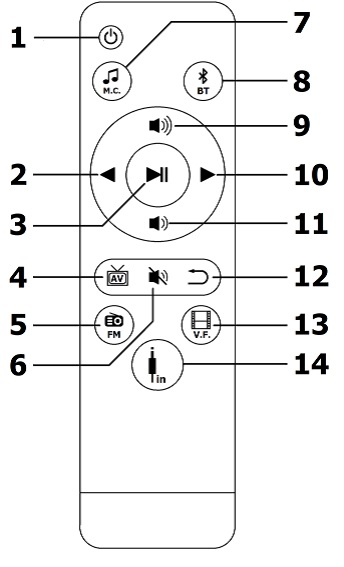
Control is available from the front panel or via the supplied I.R.
remote control handset.
Insert 2 x AAA batteries into the rear compartment to use this remote.
| No |
Function |
| 1 |
Power on/off |
| 2 |
Previous track/station/option |
| 3 |
Play/Pause / BT Mute / Select |
| 4 |
- Not used - |
| 5 |
FM tuner mode |
| 6 |
Mute output |
| 7 |
Music (USB/microSD) playback |
| 8 |
Bluetooth Mode |
| 9 |
Volume + |
| 10 |
Next track/station/option |
| 11 |
Volume - |
| 12 |
Return |
| 13 |
- Not used - |
| 14 |
Line input mode |
Remote Control
Main Menu
To access the main menu from power up or playback, touch or press the
Return key until the set of icons shown below is displayed.

Use the Previous and Next keys to navigate through the menu options and
press Play/Pause to select the required option.
Each icon has a sub menu which are described in each section on the
following pages.
MSC (music) USB/SD Player
Insert a microSD or USB stick to the ports on the bottom edge of the
faceplate and playback of audio files will begin automatically. If this
does not happen, ensure that the media is formatted to FAT32 and the
files stored onboard are supported types (see Specifications).
If the main menu screen is displayed, select the MSC option or press
M.C. on the remote.
Note: If both microSD and USB media are connected, the last connected
will take priority.
Touching Play/Pause on the face plate or remote will start or
temporarily stop playback and stored tracks can be navigated using the
Previous Track and Next Track keys.
The output volume level is adjusted using the Volume + / - buttons.
Playback Options
Holding the Play/Pause key on the faceplate during playback will enter
the playback menu.
Use Previous and Next keys to navigate options and Play/Pause to select.
|
|
|
|
|
| Repeat |
Equalizer |
Local Folder |
Delete File |
Return |
| Repeat All |
Natural |
Root |
Press Play/Pause to delete current track |
|
| Repeat One |
Rock |
System Volume |
|
|
| Repeat Folder |
Pop |
Track number select |
|
|
| Random |
Classic |
|
|
|
| Return |
Jazz |
|
|
|
| Country |
|
|
|
|
| Return |
|
|
|
|
Pressing the Return key returns to playback.
Pressing Return again reverts to main menu.
B/T Wireless Mode
The WA-215 may be paired to a smart phone or tablet via Bluetooth mode
for wireless playback. From the main menu, navigate to the second icon
named “BT” and press Play/Pause. A musical note and the “B” logo will
appear on the screen.

Enable Bluetooth on the sending device and search for the device ID
“Adastra WA-215”. Select to pair with “Adastra WA-215” and when
connected, an arrow is displayed pointing to another musical note to
confirm that the connection is successful.
Play audio tracks on the sending device and check for output on the
connected speakers.
Ensure that the volume level on the sending device is not set too low or
at zero.
Press Play/Pause to pause or continue playback. The display shows “MUTE”
when paused.
Previous and Next keys on the WA-215 will remotely navigate tracks on
the sending device.
Press “Volume +” to increase volume or “Volume -” to decrease volume.
Pressing Mute on the remote will also mute or un-mute the output.
Touching the Return key exits the Bluetooth mode and disconnects from
the sending device.
Enabling Bluetooth mode with a paired device in range will re-connect
automatically.
FM Tuner
The WA-215 also has a built-in FM radio tuner. For best reception, it is
advised to connect an FM antenna via the terminals at the rear of the
main unit.
From the main menu, navigate to the FM icon and touch Play/Pause or
press the FM button on the remote. The display will show “FM”, the
channel number and its FM frequency.
To initiate auto-tune to find available radio stations, touch and hold
the Play/Pause key.
The FM tuner will sweep through FM frequencies and store the strongest
signals as pre-set channels. After auto-tuning, the Previous and Next
keys will step through stored channels.
A short press on the Play/Pause key will mute or un-mute the FM tuner
output.
(a long press will re-tune all available channels again)
Press “Volume +” to increase volume or “Volume -” to decrease volume.
Touching the Return key exits the FM mode and reverts to the main menu.
Line Input
The terminal connections on the rear of the main unit include a stereo
auxiliary line input, as described in the “Connections” section. To
enable this input through the WA-215 amplifier from the main menu,
navigate to the icon named “LIN” (line input) and a picture of a stereo
phone plug will be displayed.
Press “Volume +” to increase volume or “Volume -” to decrease volume.
Pressing Play/Pause (or Mute on the remote) will mute or un-mute the
output.
Touching the Return key exits the FM mode and reverts to the main menu.
System Menu
From the main menu, navigate to the SYS icon (far right) and touch
Play/Pause.
Use Previous and Next to navigate options and Play/Pause to select from
the options below.
|
|
|
|
|
| Backlight |
Language |
Contrast |
Firmware Ver. |
Return |
| 0 sec. |
English |
0 - 19 |
Firmware version No. |
|
| 10 sec. |
Return |
|
|
|
| 0 sec. |
|
|
|
|
| 1 min. |
|
|
|
|
| 2 min. |
|
|
|
|
| 5 min. |
|
|
|
|
| 10 min. |
|
|
|
|
| Return |
|
|
|
|
Backlight adjusts the time that the LCD backlight stays lit after no
keys are pressed/touched.
Note: a value of “0” seconds means that the backlight will stay lit and
not switch off.
Contrast adjusts the brightness depth of the LCD display via a sliding
bar setting.
Firmware Ver. Displays the firmware version of the WA-215
