DM-8 Digital Messaging Unit
DM-8 digital messaging unit for
scheduled music, announcements, and alerts in your public address
system. This unit is designed to provide flexible and hassle-free
automation of audio playback, fully programmable by the operator.

Front Panel

1. Paging microphone gain adjustment
2. Paging microphone XLR/jack combo input
3. Paging button
4. Schedule / Record / Return button
5. Clock set / Repeat button
6. LCD display
7. Message 1 - 8 direct trigger buttons
8. Message output level control
9. SD card slot
10. Output level indicator LED's
11. Power on/off switch
Rear panel

12. IEC mains inlet and fuse holder
13. 24Vdc power terminals
14. Message 1-8 trigger & RELAY terminals
15. Balanced line output (screw terminals)
16. Unbalanced line output (2 x RCA)
17. Phantom power & mic/line level DIP switches
18. Paging microphone or line input (screw terminals)
19. BGM background music input (RCA L+R)
20. BGM background music output level
Preparing The SD Card
The DM-8 message player requires an SD card (or microSD with adaptor) to
read the message and schedule information from. The SD card should be
formatted to FAT32 and is recommended to be between 4GB and 32GB in
capacity.
 NOTE: It is necessary to use a new or
completely blank SD card. If re-using an existing SD card, it must be
fully formatted using the application called SD Memory Card
Formatter, which is available at the sdcard.org website.
NOTE: It is necessary to use a new or
completely blank SD card. If re-using an existing SD card, it must be
fully formatted using the application called SD Memory Card
Formatter, which is available at the sdcard.org website.
The standard “Format” function provided by your PC operating system does
not always remove all of the data and the SD card might not work with
the DM-8.
If pre-recorded messages are to be used, these must be in standard mp3
audio format and stored to the root folder of the SD card with file
names as follows…
“M001.mp3, M002.mp3, M003.mp3… M099.mp3”
… for up to 99 message tracks.
The message tracks must be stored into a folder called MESSA, which
itself needs to be in the root folder of the SD card, for the DM-8 to
recognize them.
The message schedule must be stored on the SD card as a text file, named
as schedule.txt which can be created using the free
DM8_Schedule_Editor.exe application.
This application is downloadable from…
http://www.avsl.com/assets/downloads/953053UK_software.zip
and runs without installation on PC computers running Windows XP and
above.
Save the software file to either the SD card or onto the PC and double
click this .exe file to run from the stored location. Any schedules that
are created and exported will be saved to the same directory. The
opening window of the DM8_Schedule_Editor.exe application is a new
blank schedule, which can be edited, exported, imported (from a
previously made file) and saved as a backup or copy. A new schedule can
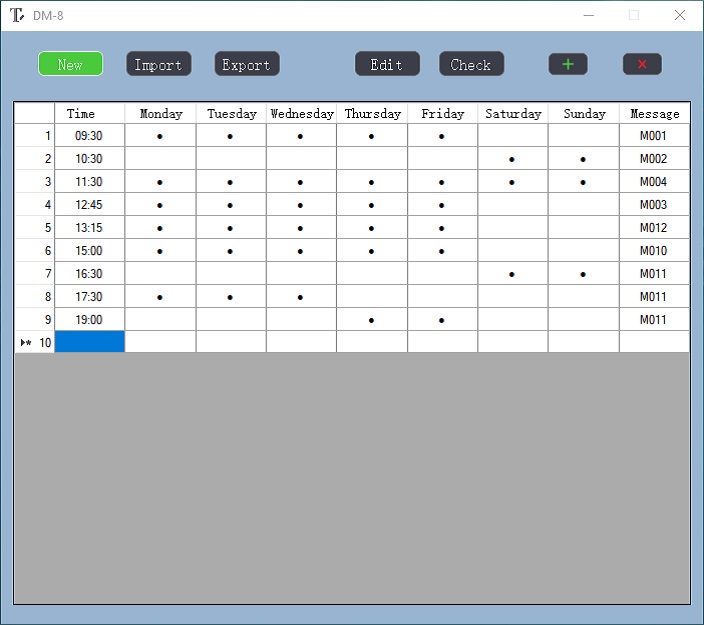
be opened at any time by clicking “New”.
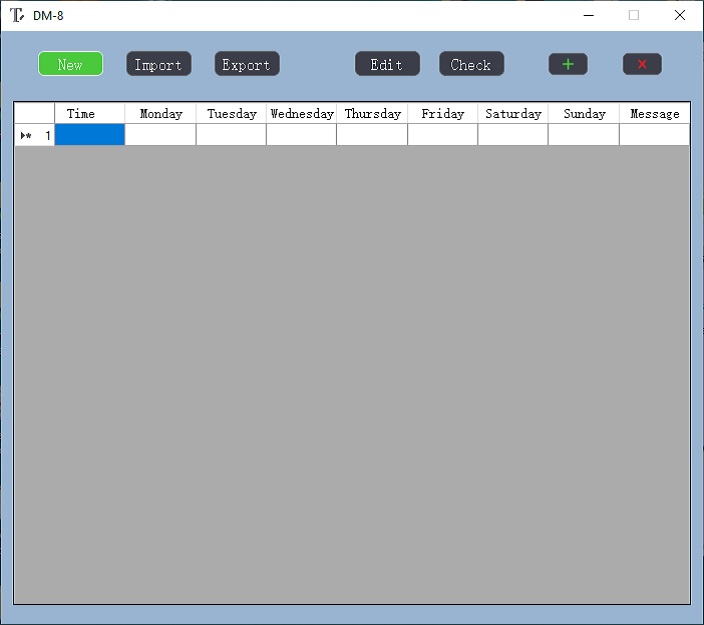
To begin creating a schedule.txt file, click on “Edit” or double click
the highlighted “Time” field.
This will open the event editor window as shown below.
Edit the required time of day by clicking in the hour and minutes fields
and entering the values directly - or - select from the drop-down arrow
to the right of each field.
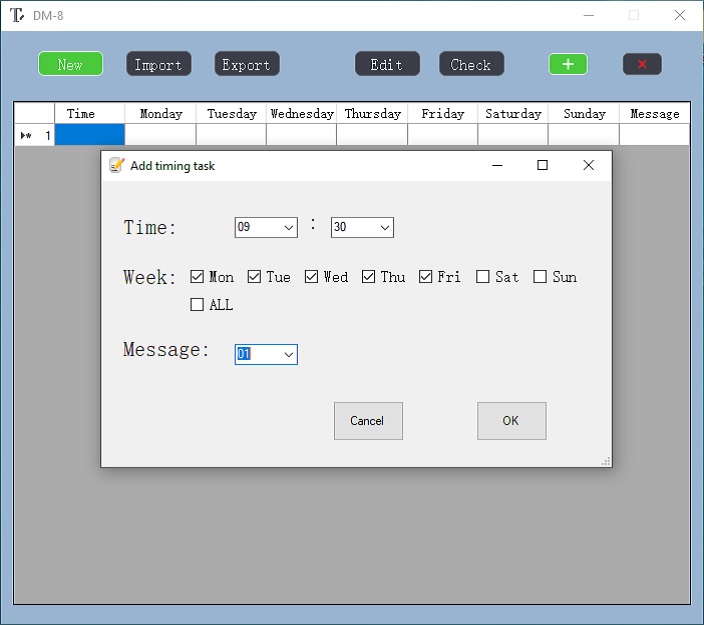 Next, click on the days of the week that this event
will occur on (click on ALL to fill in every day quickly if preferred).
Finally, select the message that will be triggered on these days at the
selected time from 001 to 099.
Next, click on the days of the week that this event
will occur on (click on ALL to fill in every day quickly if preferred).
Finally, select the message that will be triggered on these days at the
selected time from 001 to 099.
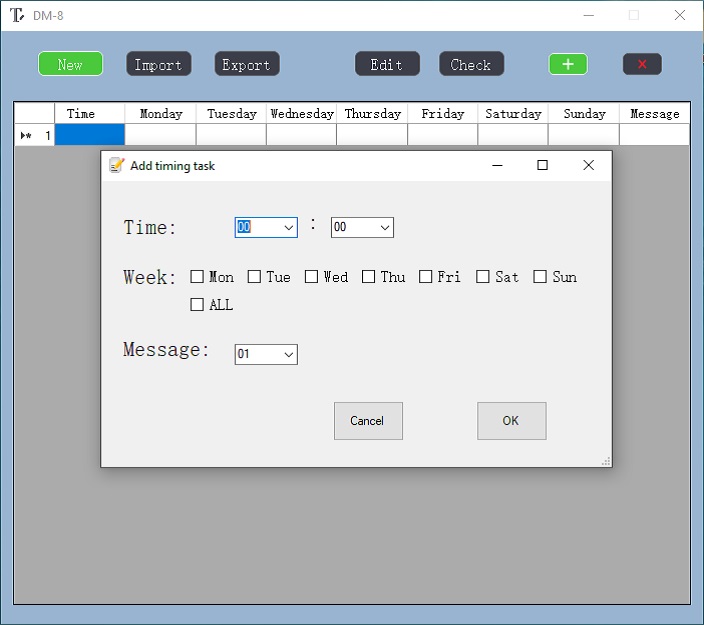
When the time, days and message are set, click on OK and the window will
return to the schedule list showing the newly set event. The next line
down will be highlighted, and the process can be repeated for up to 99
schedule events.
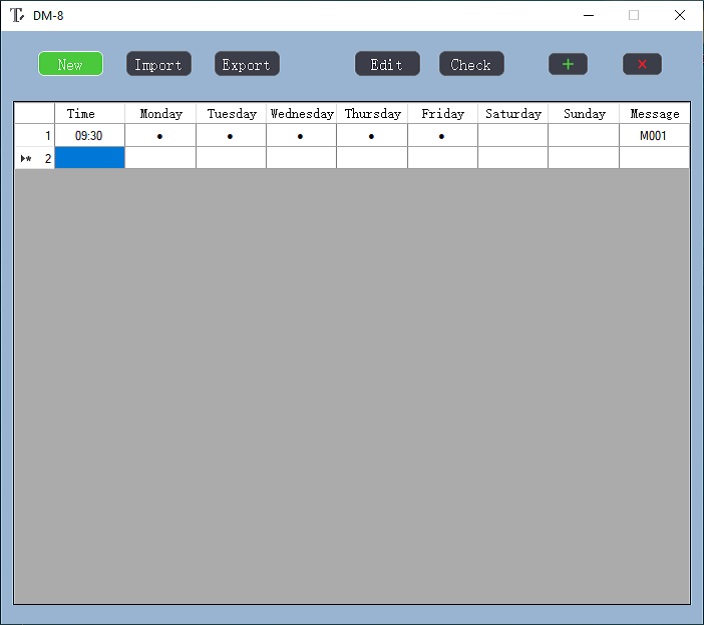
Each event will be displayed as a line until all required message events
are completed.
Any event can be further edited by selecting it and clicking Edit or by
simply double clicking on the line of that event.
Over-write any of the settings and click OK again to save the changes.
Any event can also be deleted from the schedule by clicking the red
X or another event added by clicking the green +.
NOTE: Ensure that the schedule file is only set to trigger mp3 files
that exist within the MESSA folder.
If the schedule is set to trigger any mp3 files (M001 – M099)
that are missing from the MESSA folder, this will
result in a read error (this is shown by a “READ ERR” message after
the startup cycle).
Once all event settings are finalized as required, click on “Check” to
verify that all the event timings are set correctly.
This will display the message “Attention Timing is correct. Please
export the document”. Click OK to close this window.
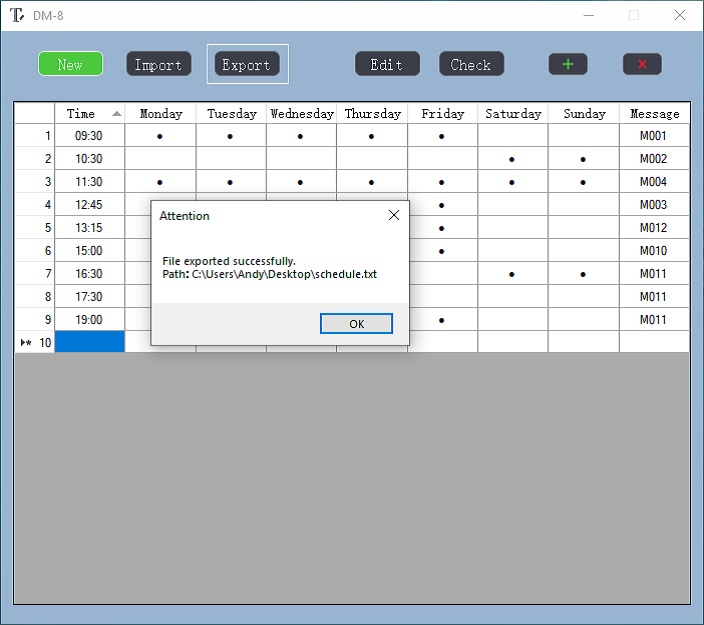
To create the schedule.txt file, click “Export”. This will display
the message “Attention File exported successfully” with
the file path (in the same directory as DM8_Schedule_Editor.exe).
Click OK to confirm again. 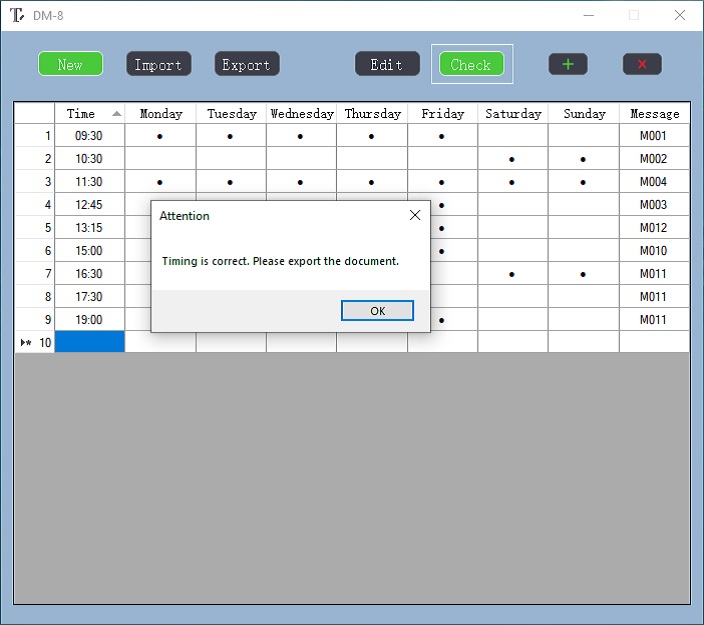
The resulting text document schedule.txt can be opened in a notepad
editor to check and edit if required. This can be stored on the PC and
can even be re-edited in the schedule software by clicking on “Import”
and browsing to the file.
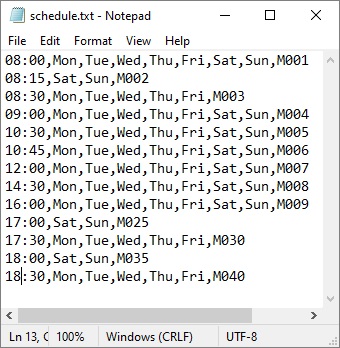 The format of the schedule.txt document is
Time,Days,Message
The format of the schedule.txt document is
Time,Days,Message
(all separated by commas only - an example is shown opposite)
The Time format is 4-digit, 24-hour (midnight = 00:00)
The Days are abbreviated to the first 3 letters (Monday = Mon)
The Message is the file name without .mp3 (message 1 = M001)
If preferred, the schedule file can be written from scratch without the
editor software by using a text editor or even using a spreadsheet
editor (as a .csv file and then converted to a .txt file)
Each event must be on a separate line and must not have spaces.
If the schedule is to be edited or written in a text editor (such as
Notepad), it is imperative to keep the same format and not add spaces or
alter punctuation, as this would make the file invalid.
This file must be saved to the root folder of the SD card.
The file name must be schedule.txt for the DM-8 to recognize it.
The DM-8 looks for the schedule.txt file on power-up and reads it to
set up the message playback schedule.
This is in addition to the message mp3 files mentioned at the start of
this section.
NOTE: If any manually entered events coincide at the same time, this
will result in a “READ ERR” message on startup.
DM8_schedule_editor.exe will pop up a warning if any events clash in
the schedule and highlight them in red.
Connection and Setup
Ensure the Power (11) is switched off until all input and output
connections are in place.
Turn the OUTPUT LEVEL (8) and rear BGM level (20) fully down
(anti-clockwise) as a precaution before switching on.
Insert an SD card or microSD with adaptor (4-32GB recommended) formatted
to FAT32 (using the “SD Memory Card Formatter”) that has been prepared
with the MESSA folder containing mp3 files and a schedule.txt
file as described above into the SD slot (9)
Connect a line output either from balanced terminal (15) or RCA (16) on
the rear panel to a line input on the mixer or amplifier of the public
address system.
Note: This output is mono. To feed the output from the screw terminals
to both sides of a stereo system, it is necessary to connect the screw
terminal output to both Left & Right inputs on the receiving mixer or
amplifier.
A mic/line input for live announcements or recording messages is
connected via rear terminals (18) or front XLR (2). There are 2 DIP
switches (17) to select mic or line level and whether +20V phantom power
is enabled for this input. For a connected microphone, select MIC level
and if it is a condenser type which requires phantom power, set PHANTOM
to “on”. For a line level signal (such as a CD or mp3 player or even
another DM-8), select LINE level and PHANTOM to “off”.
If background music is to be played in the listening area, connect the
background music source to the BGM INPUT (19) RCA sockets. This input is
governed by its own volume control (20) and is overridden by the
messages and paging input.
For remote triggering of messages 1 to 8 (M001.mp3 to M008.mp3),
screw terminals on the rear panel (14) can be connected to switches. The
function of these is described in detail on the following page.
Connect the rear IEC inlet (12) to a power outlet using the supplied
mains lead (or an equivalent approved type).
If 24Vdc power is to be used, connect this to the 24Vdc POWER +/-
terminals (13)
Initial Checks
Ensure that level controls are turned down on connected PA equipment and
switch on power to the DM-8 (11).
The display will light to confirm power is on.
Turn up the OUTPUT (8) and check the MIC/LINE input (2) by pressing the
PAGE button to “on” (3) so that the indicator is lit, and then speaking
into the mic or playing audio whilst turning up the MIC/LINE level
control (1).
NOTE: The MIC/LINE input has the highest priority and will temporarily
suppress the output level of message playback and BGM input when the
PAGE switch is active and a mic or line signal is present on the
MIC/LINE input.
To check playback of messages or music from the SD card, there will need
to be mp3 audio tracks stored in a folder named MESSA. Each file
needs to be stored with the naming format “M001, M002, M003 … M099” as
described above for the DM-8 to recognize it. The first 8 messages
(M001.mp3 to M008.mp3) can be played back directly by pressing
buttons 1 to 8 on the front panel (7).
When first switched on with the prepared SD card inserted, a startup
screen will read “READING M / READING S”.
This process must be completed before any schedule or playback can
begin. If this repeats continually for more than 1 minute, power down
and try again after 10 seconds. There will be some switching sounds from
the unit, which is normal. When the startup is completed, the display
will show the number of messages stored and then show the current time.
To test the DM-8 playback, you can save a new folder to the SD card
named MESSA containing any mp3 renamed as M001.mp3. Insert the
SD card into the DM-8, power it up and wait for the startup to finish
“READING M / READING S”
Press the “1” button to check playback of M001.mp3 and if
unsuccessful, remove the SD card and re-check the content.
Playback of messages is still possible from the 1-8 message buttons (7)
if there is no schedule.txt file on the SD card.
If background music is to be played through the DM-8, check this with
the OUTPUT (8) turned up part way and the BGM volume control (20) up
part way to ensure that the audio signal is connected properly.
After the initial checks are successfully completed, adjust the
MIC/LINE, BGM and OUTPUT level controls as required for the correct
balance.
Setting The Current Time and Day
To set the current time/day, hold down the CLOCK SET (5) for 5 seconds
and the hour characters will flash in the display.
Message number 1 and 5 buttons will now operate as up (˄) and down (˅)
buttons for the number setting.
Adjust the hour setting using the ˄ and ˅ buttons, then press the
SCHEDULE/REC button to move to the minutes setting.
Adjust the minutes setting using the ˄ and ˅ buttons, then press the
SCHEDULE/REC button to move to the day setting.
Adjust the day setting using these ˄ and ˅ buttons and then press the
SCHEDULE/REC button to complete the time setting process.
Pressing the CLOCK SET button at any point above will also complete the
current time and day setting process.
Recording a Message
As described above, any mp3 file can be re-named to “M001…M099”
and stored in the MESSA folder on the SD card.
Alternatively, any of the first 8 tracks can be recorded directly from
the Mic/Line input (2) as follows:
Press the PAGE button (3) in to the “on” position (the LED will
illuminate & the MIC/LINE input will become live).
Press the REC (4) button and the word “REC” will flash in the
display.
Select a number from 1 to 8 on the message buttons (7) and recording
will commence for that message number.
When recording starts, begin speaking into the microphone (or
playing audio) connected to the Mic/Line input.
A timer will display elapsed minutes and seconds during recording.
Press the REC button or PAGE button off when finished to store the
recording in the selected message number.
Press the selected message number button to play back the recorded
audio back for checking.
Playback of Tracks
To play any of the first 8 tracks M001 - M008, press the relevant direct
trigger button for that message (7).
There is a white strip next to each direct trigger button on the front
panel for labelling if required.
During playback, a ► symbol will be shown in the display and the output
indicator (10) will show the level at the output.
Pressing the PAGE button (3) will stop any message playback (this will
activate the MIC/LINE input – pressing again will deactivate it). If any
message button is pressed whilst a message is already playing, it will
override the current message.
The CLOCK SET button (5) is also a REPEAT () button. Pressing this
briefly before or during playback will cause the symbol to show in the
display and the current playing track will loop continuously until
either the CLOCK SET button is pressed again, which will end the
repeating function, or if the PAGE button is pressed, the track will
stop immediately.
In addition to control from the front panel, screw terminals numbered 1
to 8 are provided on the rear panel for remote playback (14). Connecting
one of these terminals to the GND (GrouND) terminal via a momentary
switch will initiate playback of that numbered track whenever the switch
is closed.
(e.g. wiring the “7” and Ground terminals to a push-to-make switch will
cause M007 to play when the switch is pressed)
If the switch is held closed (as with a latching switch), the track will
play repeatedly, retriggering until the switch is open.
If connecting the DM-8 to a fire or security alarm panel with a trigger
voltage output, use a relay switch that operates at the appropriate
trigger voltage to close the required contacts when the alarm is
activated.
The message priority is fixed as 1>2>3>4>5>6>7>8,
with lower numbers overriding higher numbers if both connected to GND.
Wiring a momentary switch to the STOP terminal and Ground will provide a
switch to stop all playback.
The 2 leftmost screw terminals are a pair of RELAY contacts which are
closed when any message is playing back. This can be used to complete a
circuit for a lamp to act as a visual message indicator or for any other
device up to 1A current.
The tracks and schedule are played directly from files stored on the
inserted SD card and not read into internal memory on the DM-8. Removing
the SD card will stop all functions and the display will show that the
notification “No SDCARD”.
Viewing The Schedules
The DM-8 can be automated to play back of any of the 99 tracks in the
MESSA folder at a pre-set time on selected days of the week. There
are no special limitations on the message mp3 content, so this could be
an announcement, sound effect or even a full music mix.
The schedule must be programmed or edited on a PC as described in the
“Preparing the SD Card” section above.
To check that the schedule.txt file has been correctly read by the
DM-8, the schedules can be viewed on the LCD display. To do this, hold
down the SCHEDULE/REC button (4) for 5 seconds and use the number 1 (˄)
and 5 (˅) buttons to step through the schedules that are currently
active on the DM-8.
These show the time, day(s) and message number that will be triggered at
that time.
NOTE: The schedule cannot be edited directly on the DM-8.
Powering Down
To avoid any loud transients through the connected PA system, it is
recommended to stop any playback and turn down the Mic/Line, BGM and
OUTPUT level controls as a precaution.
Page/Rec, Mic, Clock Set, Schedule, Message 1-8, Output, Power on/off
